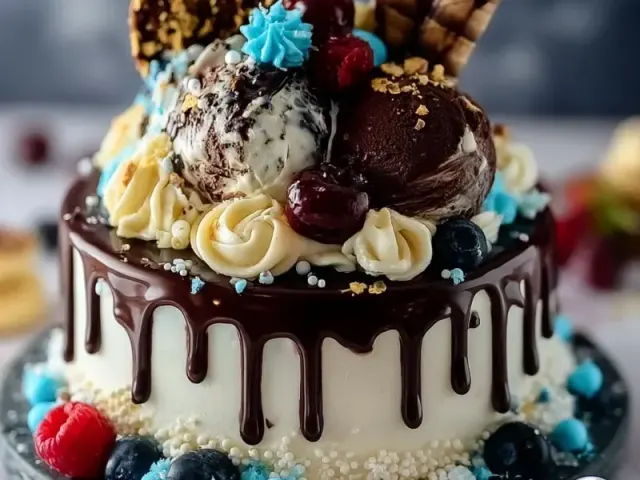
How to Make a Drip-Decorated Ice Cream Cake at Home
The first time I made a drip cake, the ganache ran straight off the sides and pooled on the plate like a sad chocolate puddle. That's when I learned the secret: temperature. A drip-decorated ice cream cake is all about timing and technique. Get those right, and you'll have a glossy, dramatic dessert that looks like it came from a bakery — but tastes even better because you made it.

Why This Technique Works
The key to a perfect drip is a ganache that's thick enough to cling but fluid enough to fall. I keep the ratio at 1:1 cream to chocolate by weight, with a touch of corn syrup for shine and flexibility. The corn syrup also prevents the ganache from cracking when it hits the frozen cake. The cake itself needs to be fully frozen — at least 4 hours, preferably overnight — so the drip sets on contact without soaking in.
Building the Layers
Start with a sturdy base. A chocolate cookie crust provides structure and flavor. Press it firmly into the pan — I use the bottom of a measuring cup for even pressure. Freeze it for 15 minutes before adding the first ice cream layer.
For the ice cream, use good-quality brands with higher fat content (14-16% milkfat). Lower-fat ice creams contain more air and water, which creates icy crystals and a softer cake. Let the ice cream soften in the fridge for 20 minutes, not on the counter. This slows the melting and keeps layers distinct.
Spread the vanilla layer first, smoothing it with an offset spatula. Freeze for 2 hours minimum. Then add the chocolate layer. The two-hour freeze between layers prevents them from blending into a muddy swirl. When you spread the second layer, work from the center outward to avoid disturbing the first layer.
The Drip: Temperature Is Everything
Make the ganache while the cake gets its final freeze. Heat the cream until it's steaming but not boiling — about 180°F (82°C) on a thermometer. Pour it over the chocolate chips, let sit for 2 minutes, then stir gently until smooth. Add the corn syrup and salt. Let it cool to 90°F (32°C). This is the sweet spot.
Test the consistency on the back of a cold spoon: if it runs off in a steady stream, it's ready. If it's too thick, add a teaspoon of warm cream. Too thin, let it cool another minute. Pour the ganache from a height of about 2 inches above the center of the cake. Let it pool, then gently tilt the plate so the drip runs evenly around the sides. Work quickly — the cake is cold and the ganache will start setting within 30 seconds.
Garnish and Slice
Before the ganache fully sets, sprinkle your topping around the edge. Toasted almonds add crunch and contrast. Or use colorful sprinkles for a birthday vibe. Freeze the cake for 30 minutes to lock everything in place.
For clean slices, use a chef's knife dipped in hot water and wiped dry between cuts. The hot blade glides through frozen layers without cracking the drip. Serve straight from the freezer — a 5-minute rest on the counter softens it just enough for easy eating without melting the structure.
Common Mistakes and Fixes
Drip runs off completely
Your ganache was too warm. Let it cool to 90°F and test on a chilled plate first.
Layers look muddy
The ice cream was too soft when spread. Chill each layer fully before adding the next.
Crust crumbles when slicing
Press the crust more firmly and freeze it longer. Use melted butter that's still warm when mixing with crumbs.
This drip-decorated ice cream cake is a technique worth mastering. Once you get the temperature right, you can swap flavors, add fillings, or change the topping. The method stays the same. And the result is always a showstopper.
Frequently Asked Questions
Why did my ganache drip run all the way down the cake?
The ganache was too warm. It should be around 90°F (32°C) — just warm enough to flow slowly. If it's hotter, it will run straight off. Let it cool while stirring occasionally until it thickens to a honey-like consistency.
Can I use store-bought ice cream?
Yes, but let it soften at room temperature for 10-15 minutes so it spreads easily without melting completely. Over-softened ice cream will make the layers blend together.
How do I get clean slices of ice cream cake?
Use a sharp knife dipped in hot water and wiped dry between each cut. This melts through the frozen layers without dragging. For best results, slice while the cake is still frozen solid.
Can I make this cake dairy-free?
Yes, substitute the ice cream with dairy-free alternatives (coconut or oat milk based) and use a dairy-free chocolate and cream for the ganache. Note that the texture may be softer. For specific dietary needs, consult a qualified professional.
How far ahead can I make this cake?
You can assemble the ice cream layers up to 3 days in advance. Add the drip and garnish on the day you plan to serve for the best appearance. Store wrapped tightly in the freezer.
Drip-Decorated Ice Cream Cake

A layered ice cream cake with a glossy chocolate drip and crunchy topping. Perfect for birthdays or any celebration.
- 9-inch springform pan
- electric mixer
- offset spatula
- piping bag or zip-top bag
- microwave-safe bowl
- parchment paper
- baking sheet
- 1 ½ cups chocolate cookie crumbs (about 18 Oreos, filling removed, 4 tbsp unsalted butter, melted, 1 ½ quarts vanilla ice cream, softened, 1 ½ quarts chocolate ice cream, softened, 1 cup heavy cream, 1 cup semi-sweet chocolate chips, 2 tbsp light corn syrup, ¼ tsp salt, ½ cup toasted chopped almonds or sprinkles, for garnish)
- Line the bottom of a 9-inch springform pan with parchment paper. Press the cookie crumbs and melted butter mixture firmly into the bottom. Freeze for 15 minutes. 2. Spread the softened vanilla ice cream evenly over the crust. Freeze for at least 2 hours until firm. 3. Spread the softened chocolate ice cream over the vanilla layer. Smooth the top with an offset spatula. Freeze for at least 4 hours, or overnight. 4. Make the ganache drip: In a microwave-safe bowl, combine heavy cream, chocolate chips, corn syrup, and salt. Microwave in 20-second bursts, stirring after each, until smooth. Let cool to 90°F (32°C) — it should be thick but pourable. 5. Remove the cake from the pan and place on a serving plate. Pour the ganache over the center, letting it drip down the sides. Work quickly. 6. Immediately sprinkle the almonds or sprinkles around the top edge. Freeze for 30 minutes to set the drip. 7. Slice with a hot knife (dip in hot water, wipe dry) for clean cuts. Serve straight from the freezer.
Store leftover cake tightly wrapped in the freezer for up to 1 week. Let the cake sit at room temperature for 5 minutes before slicing for easier cutting. For a nut-free version, omit almonds and use sprinkles or crushed cookies. Contains dairy, gluten, and nuts. For dietary concerns, consult a qualified professional.
Recipe: Drip-Decorated Ice Cream Cake
Equipment
- 9-inch springform pan
- electric mixer
- offset spatula
- piping bag or zip-top bag
- microwave-safe bowl
- parchment paper
- baking sheet
Ingredients
- 1 ½ cups chocolate cookie crumbs (about 18 Oreos, filling removed, 4 tbsp unsalted butter, melted, 1 ½ quarts vanilla ice cream, softened, 1 ½ quarts chocolate ice cream, softened, 1 cup heavy cream, 1 cup semi-sweet chocolate chips, 2 tbsp light corn syrup, ¼ tsp salt, ½ cup toasted chopped almonds or sprinkles, for garnish)
Instructions
- Line the bottom of a 9-inch springform pan with parchment paper. Press the cookie crumbs and melted butter mixture firmly into the bottom. Freeze for 15 minutes. 2. Spread the softened vanilla ice cream evenly over the crust. Freeze for at least 2 hours until firm. 3. Spread the softened chocolate ice cream over the vanilla layer. Smooth the top with an offset spatula. Freeze for at least 4 hours, or overnight. 4. Make the ganache drip: In a microwave-safe bowl, combine heavy cream, chocolate chips, corn syrup, and salt. Microwave in 20-second bursts, stirring after each, until smooth. Let cool to 90°F (32°C) — it should be thick but pourable. 5. Remove the cake from the pan and place on a serving plate. Pour the ganache over the center, letting it drip down the sides. Work quickly. 6. Immediately sprinkle the almonds or sprinkles around the top edge. Freeze for 30 minutes to set the drip. 7. Slice with a hot knife (dip in hot water, wipe dry) for clean cuts. Serve straight from the freezer.