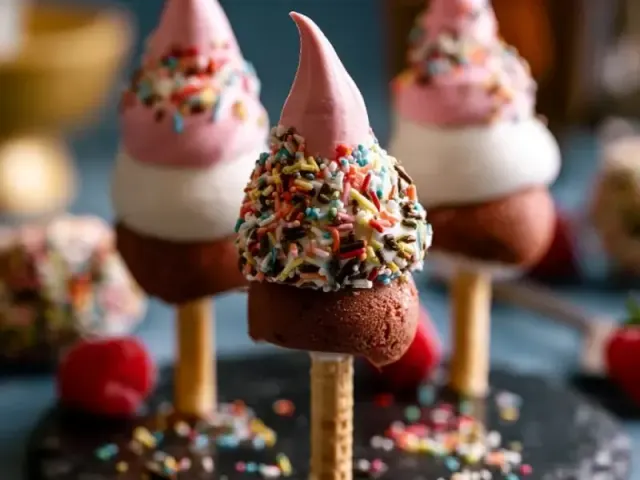
How to Make Ice Cream Cake Pops That Won't Melt or Crack
The first time I made ice cream cake pops, I ended up with a sticky puddle on the counter and a cracked chocolate shell that looked like a dried-up riverbed. The problem was simple: I didn't respect the temperature. Ice cream wants to melt, chocolate wants to seize, and cake wants to crumble. But when you get the balance right—when the ratio of cake to ice cream is precise, and the freeze times are exact—these pops become the most satisfying handheld frozen treats you'll ever pull from your freezer.

The Right Ratio: Cake to Ice Cream
I keep the ratio at about 1 part crumbled cake to 1 part ice cream by volume. That means for every cup of cake crumbs, you add one cup of slightly softened ice cream. Too much ice cream and the mixture turns into a slushy mess that won't hold a ball shape. Too little and the pops taste dry and crumbly, like a stale cake ball. The mixture should press together easily in your palm and hold its shape without sticking to your fingers.
Use any unfrosted cake—leftover birthday cake, a store-bought pound cake, or even a batch of homemade vanilla cupcakes. The cake should be dry to the touch, not moist or glazed. If it has frosting, scrape it off; the fat in the frosting will make the pops greasy and prone to melting.
Freezing Is Not Optional
After you roll the balls and insert the sticks, the pops need a solid 2 hours in the freezer. Not 45 minutes, not 1 hour. Two hours minimum. The center of each ball must reach about 0°F (-18°C) so that when you dip it in warm chocolate, the outside sets instantly and the inside stays frozen. If you rush this step, the heat from the chocolate will melt the outer layer of the pop, and you'll get a misshapen, dripping disaster.
I always freeze the baking sheet beforehand too. A cold surface keeps the balls from flattening on the bottom. It's a small step that makes a big difference in the final shape.
The Chocolate Shell: How to Get It Right
The coating is where most people go wrong. You need a thin, snappy shell that shatters when you bite into it, not a thick, gummy layer that pulls off in one piece. The trick is adding fat to the chocolate. I use 2 tablespoons of coconut oil or vegetable shortening for every 1 cup of chocolate chips. This thins the chocolate, lowers its melting point, and helps it set with a glossy finish.
Melt the chocolate and oil together in the microwave in 20-second bursts, stirring each time. Stop as soon as the mixture is smooth—overheating will make it seize. Let it cool for 5 minutes before dipping. The chocolate should feel warm to the touch, not hot. If it's too hot, it will melt the pop; if it's too cool, it will thicken and clump.
For dipping, use a deep, narrow bowl. A small glass measuring cup works perfectly. Submerge the frozen pop completely, then lift it out and let the excess drip off for a few seconds. If you want sprinkles or crushed nuts, add them immediately—the chocolate sets in about 10 seconds at room temperature.
Common Mistakes and How to Avoid Them
Mistake: The pop slides off the stick. Dip the tip of the stick in melted chocolate before inserting it. The chocolate acts as glue. Also, don't push the stick all the way through—stop at the center of the ball.
Mistake: The coating cracks in large shards. This is normal to some degree, but large cracks happen when the chocolate is too hot or the pop isn't frozen enough. Let the chocolate cool to about 90°F (32°C) and make sure the pops have frozen for a full 2 hours.
Mistake: The mixture is too sticky to roll. Your ice cream is too soft. Pop the bowl back in the freezer for 15 minutes, then try again. The mixture should be cold and firm, not room-temperature soft.
Flavor Combinations Worth Trying
Vanilla cake with strawberry ice cream and white chocolate coating. Chocolate cake with mint chip ice cream and dark chocolate coating. Lemon cake with raspberry sorbet and dark chocolate. The possibilities are endless, but the technique stays the same. Just keep the cake-to-ice-cream ratio and the freeze times consistent, and you can experiment freely.
Allergen and Dietary Notes
This recipe contains dairy, eggs (in the cake and ice cream), and gluten (in the cake). For a dairy-free version, use dairy-free ice cream and dairy-free chocolate chips. For a gluten-free version, use gluten-free cake. For egg-free, use an egg-free cake and a vegan ice cream. Always check labels for specific allergen information. If you have specific dietary concerns, consult a qualified professional for personalized advice.
The Takeaway
Ice cream cake pops are a technique-first recipe. Respect the freeze times, nail the ratio, and handle the chocolate with care, and you'll get a batch of perfect, crack-free pops every time. They're the kind of treat that disappears fast at parties—not because they're complicated, but because they're exactly what a frozen dessert should be: cold, creamy, and wrapped in a thin shell of chocolate that shatters with the first bite.
Frequently Asked Questions
Can I use any flavor of cake and ice cream?
Absolutely. Vanilla cake with strawberry ice cream, chocolate cake with mint chip, or lemon cake with raspberry sorbet all work well. The key is to keep the ratio at about 1 part cake to 1 part ice cream by volume—too much ice cream makes the pops sloppy, too little makes them dry.
Why did my chocolate coating crack when I bit into it?
That's actually normal—the coating is a thin shell that shatters when you bite into the frozen pop. To minimize large cracks, make sure the pops are completely frozen (at least 2 hours) and that the chocolate is warm but not hot when you dip. Cooling the chocolate to about 90°F (32°C) helps it set evenly.
How do I keep the pops from sliding off the sticks?
Dip the tip of the lollipop stick in a little melted chocolate before inserting it into the frozen ball. The chocolate acts like glue. Also, don't push the stick all the way through—stop at the center of the ball for the best hold.
Can I make these ahead for a party?
Yes, they're perfect for advance prep. Assemble and dip up to 2 weeks ahead. Store in an airtight container in the freezer with parchment between layers. Let them sit at room temperature for 2–3 minutes before serving so they're easy to bite.
Ice Cream Cake Pops

Creamy ice cream blended with crumbled cake, rolled into balls, frozen, and dipped in a chocolate shell that sets instantly. A perfect handheld frozen treat.
- large baking sheet
- parchment paper
- cookie scoop (1.5-inch)
- lollipop sticks
- small deep bowl
- microwave-safe bowl
- fork or dipping tool
- 2 cups about 6 ounces crumbled baked cake (any flavor, no frosting)
- 1 pint 2 cups ice cream, slightly softened
- 1 cup semisweet or white chocolate chips
- 2 tablespoons coconut oil or vegetable shortening
- Optional: sprinkles (crushed nuts, or mini chocolate chips for decoration)
- Line a large baking sheet with parchment paper. Freeze it for 10 minutes.
- In a large bowl, combine crumbled cake and slightly softened ice cream. Mix with a spatula until evenly blended—the mixture should hold together when pressed but not be sticky or wet.
- Using a 1.5-inch cookie scoop, portion the mixture and roll into smooth balls. Place on the chilled baking sheet. Insert a lollipop stick into each ball, pushing about halfway through. Freeze for at least 2 hours, until rock solid.
- In a microwave-safe bowl, combine chocolate chips and coconut oil. Microwave in 20-second bursts, stirring after each, until completely smooth. Let cool for 5 minutes—it should be warm but not hot to the touch.
- Working with one pop at a time, dip the frozen ball into the melted chocolate, letting excess drip off. If using sprinkles, add them immediately before the chocolate sets. Return to the baking sheet. Repeat with remaining pops.
- Freeze for another 30 minutes to fully set the coating. Serve straight from the freezer.
Storage: Keep in an airtight container in the freezer for up to 2 weeks. To serve, let sit at room temperature for 2–3 minutes to soften slightly. For a dairy-free version, use dairy-free ice cream and chocolate. For a nut-free version, skip nut-based toppings. Always use a deep, narrow bowl for dipping—it makes coating easier and cleaner. Handle lollipop sticks carefully when inserting; they can snap if forced. Common mistake: if the ice cream mixture is too soft, the pops won't hold their shape. Freeze the baking sheet beforehand to keep everything cold.
Recipe: Ice Cream Cake Pops
Equipment
- large baking sheet
- parchment paper
- cookie scoop (1.5-inch)
- lollipop sticks
- small deep bowl
- microwave-safe bowl
- fork or dipping tool
Ingredients
- 2 cups about 6 ounces crumbled baked cake (any flavor, no frosting)
- 1 pint 2 cups ice cream, slightly softened
- 1 cup semisweet or white chocolate chips
- 2 tablespoons coconut oil or vegetable shortening
- Optional: sprinkles (crushed nuts, or mini chocolate chips for decoration)
Instructions
- Line a large baking sheet with parchment paper. Freeze it for 10 minutes.
- In a large bowl, combine crumbled cake and slightly softened ice cream. Mix with a spatula until evenly blended—the mixture should hold together when pressed but not be sticky or wet.
- Using a 1.5-inch cookie scoop, portion the mixture and roll into smooth balls. Place on the chilled baking sheet. Insert a lollipop stick into each ball, pushing about halfway through. Freeze for at least 2 hours, until rock solid.
- In a microwave-safe bowl, combine chocolate chips and coconut oil. Microwave in 20-second bursts, stirring after each, until completely smooth. Let cool for 5 minutes—it should be warm but not hot to the touch.
- Working with one pop at a time, dip the frozen ball into the melted chocolate, letting excess drip off. If using sprinkles, add them immediately before the chocolate sets. Return to the baking sheet. Repeat with remaining pops.
- Freeze for another 30 minutes to fully set the coating. Serve straight from the freezer.