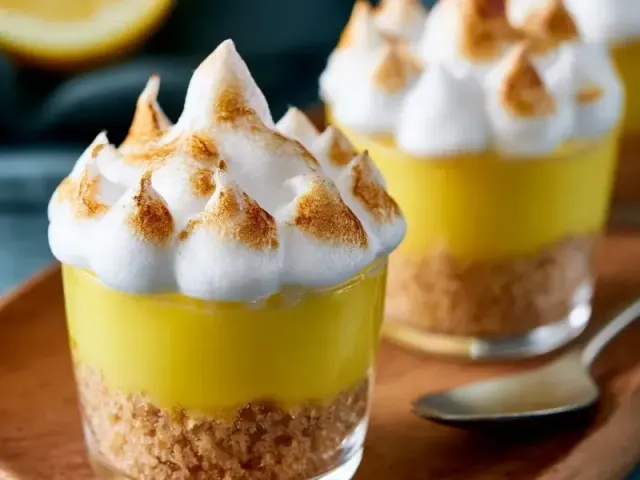
Lemon Meringue Cups: A Tangy, Toasty Dessert in 30 Minutes
There’s something about the contrast of a tart lemon curd and a cloud-like, toasted meringue that feels both nostalgic and elegant. These lemon meringue cups take that classic pie and turn it into individual servings with a crisp, buttery graham cracker crust. No slicing, no fuss. Just a bright, airy dessert that comes together in about 30 minutes.

The key to a silky lemon curd is patience and a gentle hand. I keep the heat at medium-low and whisk constantly. The moment you see the mixture start to thicken and coat the back of a spoon, pull it off the heat. That’s your cue. If you let it boil, the eggs will scramble, and you’ll end up with a lumpy mess. Straining the curd through a fine-mesh sieve is a simple step that guarantees a smooth finish.
The Crust: Simple and Sturdy
For the base, I use a standard graham cracker crust. The ratio I follow is 1 1/2 cups crumbs, 1/4 cup sugar, and 6 tablespoons melted butter. That gives you a crust that holds together without being too dense. Press it firmly into the ramekins—use the bottom of a glass or a measuring cup to get an even layer. Bake at 350°F for 8 minutes, just until it’s lightly golden and set. Let the crusts cool completely before adding the curd. If you add warm curd to a warm crust, the butter can melt and make the crust soggy.
The Lemon Curd: Bright and Silky
Whisk the eggs and sugar first, then add the lemon juice and zest. This prevents the sugar from burning on the bottom of the pan. Cook over medium-low heat, stirring constantly. You’ll feel the mixture go from thin and watery to thick and creamy. I look for the point where the curd leaves a clear trail when I drag the whisk through it. That’s usually after 6 to 8 minutes. Off the heat, stir in the butter pieces until they melt and emulsify. Strain the curd into a bowl and let it cool to room temperature. It will thicken a bit more as it cools. Divide it among the crusts and refrigerate for at least 15 minutes. That chill time helps the curd set so the meringue doesn’t sink into it.
The Meringue: Stiff, Glossy, and Stable
For the meringue, start with a clean, dry bowl. Any grease or moisture will prevent the egg whites from whipping properly. I add cream of tartar once the whites are foamy—it stabilizes the foam and helps create those stiff peaks. Add the sugar gradually, a tablespoon at a time, with the mixer on medium-high. This helps the sugar dissolve fully, which is crucial for a smooth, non-grainy meringue. Beat until the peaks are stiff and glossy. You can test by rubbing a little meringue between your fingers—if it feels smooth, the sugar is dissolved. If it feels gritty, keep beating.
When you spoon or pipe the meringue onto the chilled curd, make sure it touches the edges of the crust all around. This seals the curd and prevents the meringue from shrinking or weeping later. Use the back of a spoon to create peaks and swirls—those will toast beautifully.
Toasting the Meringue
A kitchen torch gives you the most control. Hold it about 2 to 3 inches from the meringue and move it in a sweeping motion until the peaks are golden brown. If you don’t have a torch, the broiler works too. Place the cups on a baking sheet and broil on high for 30 to 60 seconds. Watch them like a hawk—they can go from golden to black in seconds. Rotate the pan if needed for even browning.
Common Mistakes to Avoid
- Overcooking the curd: If you see bubbles forming, you’re too hot. Pull it off immediately and whisk vigorously to cool it down.
- Not sealing the meringue: If the meringue doesn’t touch the crust, it will shrink and leave gaps. The curd will seep out and make the meringue weep.
- Using a wet bowl: Even a drop of water can ruin the meringue. Dry your bowl and beaters thoroughly before starting.
These lemon meringue cups are best served within a few hours of toasting. The meringue is at its fluffiest right after torching. If you need to make them ahead, prepare the crusts and curd up to two days in advance, then assemble and toast just before serving. Store any leftovers in the refrigerator, but expect the meringue to soften and possibly weep overnight.
For the best texture and flavor, use fresh lemons. The zest adds aromatic oils that bottled juice can’t replicate. And don’t skip the straining step—it’s the difference between a curd that’s silky and one that’s slightly grainy.
Takeaway: With a few simple techniques—gentle heat for the curd, stable meringue, and a proper seal—you can create a dessert that’s as impressive as it is approachable. These lemon meringue cups deliver bright citrus flavor and a light, toasty finish in every spoonful.
Frequently Asked Questions
Can I make lemon meringue cups ahead of time?
You can prepare the crust and lemon curd up to 2 days ahead and store them separately in the refrigerator. Assemble and add the meringue just before serving, then toast. The meringue is best freshly made.
Why did my lemon curd turn out lumpy?
Lumpy curd usually means the heat was too high or you didn't stir constantly. The eggs curdled. To fix, strain the curd through a fine-mesh sieve. For next time, keep the heat medium-low and whisk continuously.
Can I use bottled lemon juice?
Fresh lemon juice gives a much brighter, cleaner flavor. Bottled juice often has preservatives that can affect the texture of the curd. I recommend fresh lemons for this recipe.
What if I don't have a kitchen torch?
You can use your oven's broiler. Place the cups on a baking sheet and broil on high for 30-60 seconds, watching closely so the meringue doesn't burn. Rotate the pan if needed for even browning.
Lemon Meringue Cups

A bright, airy dessert with a tangy lemon curd and toasted meringue, served in crisp, buttery pastry cups. Ready in 30 minutes.
- 6 (4-ounce) ramekins or oven-safe cups
- small saucepan
- whisk
- electric hand mixer or stand mixer
- piping bag (optional)
- kitchen torch or broiler
- For the crust: 1 1/2 cups graham cracker crumbs (1/4 cup granulated sugar, 6 tablespoons unsalted butter, melted. For the lemon curd: 3 large eggs, 1/2 cup granulated sugar, 1/2 cup fresh lemon juice (about 3 lemons), 1 tablespoon lemon zest, 4 tablespoons unsalted butter, cut into small pieces. For the meringue: 3 large egg whites, 1/2 cup granulated sugar, 1/4 teaspoon cream of tartar, 1/2 teaspoon vanilla extract.)
- Preheat the oven to 350°F (175°C). In a medium bowl, mix graham cracker crumbs, 1/4 cup sugar, and melted butter until the texture of wet sand. Press evenly into the bottom and up the sides of 6 ramekins. Bake for 8 minutes, until lightly golden. Cool completely on a wire rack. 2. While the crusts cool, make the lemon curd: In a small saucepan, whisk together eggs, 1/2 cup sugar, lemon juice, and lemon zest. Cook over medium-low heat, stirring constantly with a whisk, until the mixture thickens and coats the back of a spoon (about 6-8 minutes). Do not let it boil or the eggs will scramble. Remove from heat and stir in butter pieces until smooth. Strain through a fine-mesh sieve into a bowl to remove any cooked egg bits and zest. Let cool to room temperature, about 10 minutes. 3. Divide the lemon curd evenly among the cooled crusts (about 2 tablespoons each). Spread into an even layer. Refrigerate for at least 15 minutes to set. 4. Make the meringue: In a clean, dry bowl, beat egg whites and cream of tartar on medium speed until foamy. Gradually add 1/2 cup sugar, 1 tablespoon at a time, and increase speed to high. Beat until stiff, glossy peaks form and the sugar has dissolved (about 5-7 minutes). Beat in vanilla. 5. Spoon or pipe the meringue over the chilled curd, making sure to seal the edges to the crust. Use the back of a spoon to create peaks. 6. Toast the meringue with a kitchen torch until golden brown, or place under a preheated broiler for 30-60 seconds, watching closely to avoid burning. Serve immediately or chill for up to 2 hours.
Store any leftovers in the refrigerator for up to 1 day, but the meringue may weep. For best texture, assemble and toast just before serving. For a dairy-free option, use vegan butter in the crust and curd. For a gluten-free crust, use gluten-free graham crackers. Always handle hot ramekins with oven mitts. Consult a qualified professional for personal dietary decisions.
Recipe: Lemon Meringue Cups
Equipment
- 6 (4-ounce) ramekins or oven-safe cups
- small saucepan
- whisk
- electric hand mixer or stand mixer
- piping bag (optional)
- kitchen torch or broiler
Ingredients
- For the crust: 1 1/2 cups graham cracker crumbs (1/4 cup granulated sugar, 6 tablespoons unsalted butter, melted. For the lemon curd: 3 large eggs, 1/2 cup granulated sugar, 1/2 cup fresh lemon juice (about 3 lemons), 1 tablespoon lemon zest, 4 tablespoons unsalted butter, cut into small pieces. For the meringue: 3 large egg whites, 1/2 cup granulated sugar, 1/4 teaspoon cream of tartar, 1/2 teaspoon vanilla extract.)
Instructions
- Preheat the oven to 350°F (175°C). In a medium bowl, mix graham cracker crumbs, 1/4 cup sugar, and melted butter until the texture of wet sand. Press evenly into the bottom and up the sides of 6 ramekins. Bake for 8 minutes, until lightly golden. Cool completely on a wire rack. 2. While the crusts cool, make the lemon curd: In a small saucepan, whisk together eggs, 1/2 cup sugar, lemon juice, and lemon zest. Cook over medium-low heat, stirring constantly with a whisk, until the mixture thickens and coats the back of a spoon (about 6-8 minutes). Do not let it boil or the eggs will scramble. Remove from heat and stir in butter pieces until smooth. Strain through a fine-mesh sieve into a bowl to remove any cooked egg bits and zest. Let cool to room temperature, about 10 minutes. 3. Divide the lemon curd evenly among the cooled crusts (about 2 tablespoons each). Spread into an even layer. Refrigerate for at least 15 minutes to set. 4. Make the meringue: In a clean, dry bowl, beat egg whites and cream of tartar on medium speed until foamy. Gradually add 1/2 cup sugar, 1 tablespoon at a time, and increase speed to high. Beat until stiff, glossy peaks form and the sugar has dissolved (about 5-7 minutes). Beat in vanilla. 5. Spoon or pipe the meringue over the chilled curd, making sure to seal the edges to the crust. Use the back of a spoon to create peaks. 6. Toast the meringue with a kitchen torch until golden brown, or place under a preheated broiler for 30-60 seconds, watching closely to avoid burning. Serve immediately or chill for up to 2 hours.