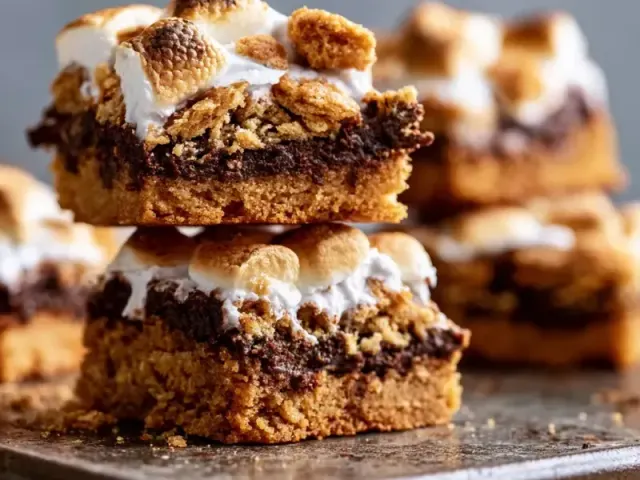
S'mores Cookie Bars: Gooey Graham Cracker & Chocolate Treat
The first time I pulled a pan of s'mores cookie bars from the oven, the kitchen smelled like a campfire at dusk — toasted marshmallow, warm chocolate, and that buttery graham cracker scent. But the real magic? The contrast between the crisp, sandy crust, the chewy cookie middle, and the puffed, blistered marshmallow top. These bars deliver everything you love about s'mores without needing a campfire or a sticky mess on your fingers. The trick is in the layering and the timing.

The Three-Layer Architecture
A great s'mores bar rests on three distinct layers: a pressed graham cracker crust, a soft chocolate chip cookie center, and a molten marshmallow-chocolate crown. Each layer needs the right technique. I keep the crust ratio at 1 ½ cups crumbs to 6 tablespoons melted butter and ¼ cup sugar — that gives you a crust that holds together when pressed but crumbles pleasantly when bitten. Pre-baking the crust for exactly 8 minutes at 350°F sets it so it doesn't turn soggy when the cookie dough goes on top.
The cookie layer is where most recipes go wrong. They make it too thick, or they overbake it. I use a standard chocolate chip cookie dough but reduce the butter slightly so the layer stays dense and chewy, not cakey. The key visual cue: the cookie layer should look just set around the edges and slightly glossy in the center when you pull it out. A toothpick will come out with a few moist crumbs — that's your signal. The residual heat will finish the baking.
Why the Topping Order Matters
After the cookie layer comes out of the oven, you have a narrow window. Sprinkle the remaining chocolate chips over the hot surface immediately. Let them sit for one full minute — this softens them just enough to spread into a smooth, even layer without melting into a puddle. Then add the marshmallows and broken graham pieces. The marshmallows go on after the chocolate because they need direct heat to puff and toast. If you put them under the chocolate, they steam rather than toast, and you lose that campfire texture.
The final bake is short — only 3 to 4 minutes. Watch the marshmallows like a hawk. They go from puffed golden to burnt in seconds. If you want deeper color, use the broiler for the last 30 to 60 seconds, but stand at the oven door. I've lost a batch to a phone call.
Common Mistake: Overpacking the Pan
Don't press the cookie dough down with force. Use gentle, even pressure with an offset spatula or floured fingertips. Pressing too hard forces the dough into the crust, making the layers blend. You want distinct strata — crust, cookie, topping — each with its own texture.
Storage and Serving Tips
These bars are best the day they're made, when the marshmallow still has that slight chew. But they keep well for two to three days in an airtight container at room temperature. If the marshmallow softens overnight, re-crisp individual bars in a 300°F oven for three minutes. For the cleanest cuts, cool the bars completely — at least one hour — and use a lightly oiled knife, wiping the blade between each slice.
This recipe contains dairy, eggs, and gluten. For a dairy-free version, substitute vegan butter and dairy-free chocolate chips. For gluten-free, use certified gluten-free graham crackers and a 1:1 gluten-free flour blend. Always consult a qualified professional for personal dietary decisions.
Takeaway: The magic of s'mores cookie bars comes from respecting each layer's role. Pre-bake the crust, underbake the cookie, and watch the marshmallows. Get those three things right, and you'll have a pan of bars that disappears faster than any campfire s'more.
Frequently Asked Questions
Can I use milk chocolate instead of semisweet?
Yes, absolutely. Milk chocolate will make the bars sweeter and creamier. If you prefer a less sweet bar, stick with semisweet or try dark chocolate chips.
Why did my cookie layer turn out dry?
The most common cause is overbaking. The cookie layer should look slightly underdone when you pull it out — a toothpick should have moist crumbs, not clean. Also, make sure you measure your flour correctly: spoon it into the measuring cup and level it off, don't scoop directly from the bag.
Can I make these s'mores bars ahead of time?
You can prepare the crust and cookie dough separately a day ahead and refrigerate. Assemble and bake fresh for best texture. Fully baked bars keep well for 2-3 days at room temperature, but the marshmallow will soften.
How do I get clean cuts without the marshmallow sticking?
Let the bars cool completely, at least 1 hour. Lightly oil your knife with a neutral oil like vegetable or canola, and wipe the blade clean between each cut. For the neatest slices, refrigerate the bars for 20 minutes before cutting.
Can I freeze s'mores cookie bars?
Yes, freeze the fully baked and cooled bars (without extra toppings) in an airtight container for up to 3 months. Thaw at room temperature, then add fresh marshmallows and broil briefly to re-toast.
S'mores Cookie Bars

Buttery graham cracker crust meets a chewy chocolate chip cookie layer, topped with toasted marshmallows and melted chocolate. These bars capture campfire flavor without the fire.
- 9x13-inch baking pan
- parchment paper
- mixing bowls
- electric mixer or whisk
- spatula
- measuring cups and spoons
- oven
- 1 ½ cups graham cracker crumbs (about 12 full sheets)
- ¼ cup granulated sugar
- 6 tablespoons unsalted butter (melted)
- 1 ½ cups all-purpose flour
- 1 teaspoon baking powder
- ½ teaspoon salt
- ½ cup unsalted butter (softened)
- ½ cup packed light brown sugar
- ¼ cup granulated sugar
- 1 large egg
- 1 teaspoon vanilla extract
- 1 ½ cups semisweet chocolate chips
- 3 cups mini marshmallows
- 4 full-size graham crackers (broken into pieces)
- Preheat your oven to 350°F (175°C). Line a 9x13-inch baking pan with parchment paper, leaving overhang on two sides for easy lifting.
- Make the crust: In a medium bowl, combine graham cracker crumbs, ¼ cup granulated sugar, and 6 tablespoons melted butter. Stir until the mixture resembles wet sand. Press firmly into an even layer on the bottom of the prepared pan. Bake for 8 minutes, until fragrant and just starting to brown at the edges. Remove and set aside.
- Make the cookie layer: In a small bowl, whisk together flour, baking powder, and salt. Set aside.
- In a large bowl, beat the softened ½ cup butter, brown sugar, and ¼ cup granulated sugar with an electric mixer on medium speed until light and fluffy, about 2 minutes. Scrape down the bowl.
- Add the egg and vanilla, beating until combined, about 30 seconds.
- Gradually add the flour mixture, mixing on low just until no dry streaks remain. Do not overmix. Fold in 1 cup of the chocolate chips.
- Drop spoonfuls of the cookie dough over the pre-baked crust. Use an offset spatula or your fingertips (lightly floured) to gently press the dough into an even layer covering the crust completely. The dough will be sticky; that's fine.
- Bake for 18 to 20 minutes, until the cookie layer is golden brown around the edges and a toothpick inserted in the center comes out with a few moist crumbs (not wet batter). The center will look slightly underdone — that's your gooey secret.
- Remove the pan from the oven. Immediately sprinkle the remaining ½ cup chocolate chips evenly over the hot cookie layer. Let them sit for 1 minute to soften, then gently spread with a spatula. Sprinkle the mini marshmallows and broken graham cracker pieces on top.
- Return the pan to the oven and bake for 3 to 4 more minutes, until the marshmallows are puffed and lightly golden. Watch closely — they can brown fast. If you want deeper toasting, switch the oven to broil for the last 30 to 60 seconds, keeping your eyes on them the entire time.
- Let the bars cool in the pan on a wire rack for at least 30 minutes before lifting out using the parchment overhang. For cleaner cuts, cool completely (about 1 hour) before slicing into 16 squares. A lightly oiled knife helps prevent sticking.
Storage: Keep in an airtight container at room temperature for up to 3 days. For longer storage, refrigerate for up to 5 days — the marshmallows will soften slightly. To re-crisp the top, pop a bar in a 300°F oven for 3-4 minutes. Allergens: This recipe contains dairy (butter), eggs, gluten (graham crackers, flour), and may contain traces of nuts (check your chocolate chips). For a dairy-free version, use vegan butter and dairy-free chocolate chips. For a gluten-free version, use certified gluten-free graham crackers and a 1:1 gluten-free flour blend. Always consult a qualified professional for specific dietary needs.
Recipe: S'mores Cookie Bars
Equipment
- 9x13-inch baking pan
- parchment paper
- mixing bowls
- electric mixer or whisk
- spatula
- measuring cups and spoons
- oven
Ingredients
- 1 ½ cups graham cracker crumbs (about 12 full sheets)
- ¼ cup granulated sugar
- 6 tablespoons unsalted butter (melted)
- 1 ½ cups all-purpose flour
- 1 teaspoon baking powder
- ½ teaspoon salt
- ½ cup unsalted butter (softened)
- ½ cup packed light brown sugar
- ¼ cup granulated sugar
- 1 large egg
- 1 teaspoon vanilla extract
- 1 ½ cups semisweet chocolate chips
- 3 cups mini marshmallows
- 4 full-size graham crackers (broken into pieces)
Instructions
- Preheat your oven to 350°F (175°C). Line a 9x13-inch baking pan with parchment paper, leaving overhang on two sides for easy lifting.
- Make the crust: In a medium bowl, combine graham cracker crumbs, ¼ cup granulated sugar, and 6 tablespoons melted butter. Stir until the mixture resembles wet sand. Press firmly into an even layer on the bottom of the prepared pan. Bake for 8 minutes, until fragrant and just starting to brown at the edges. Remove and set aside.
- Make the cookie layer: In a small bowl, whisk together flour, baking powder, and salt. Set aside.
- In a large bowl, beat the softened ½ cup butter, brown sugar, and ¼ cup granulated sugar with an electric mixer on medium speed until light and fluffy, about 2 minutes. Scrape down the bowl.
- Add the egg and vanilla, beating until combined, about 30 seconds.
- Gradually add the flour mixture, mixing on low just until no dry streaks remain. Do not overmix. Fold in 1 cup of the chocolate chips.
- Drop spoonfuls of the cookie dough over the pre-baked crust. Use an offset spatula or your fingertips (lightly floured) to gently press the dough into an even layer covering the crust completely. The dough will be sticky; that's fine.
- Bake for 18 to 20 minutes, until the cookie layer is golden brown around the edges and a toothpick inserted in the center comes out with a few moist crumbs (not wet batter). The center will look slightly underdone — that's your gooey secret.
- Remove the pan from the oven. Immediately sprinkle the remaining ½ cup chocolate chips evenly over the hot cookie layer. Let them sit for 1 minute to soften, then gently spread with a spatula. Sprinkle the mini marshmallows and broken graham cracker pieces on top.
- Return the pan to the oven and bake for 3 to 4 more minutes, until the marshmallows are puffed and lightly golden. Watch closely — they can brown fast. If you want deeper toasting, switch the oven to broil for the last 30 to 60 seconds, keeping your eyes on them the entire time.
- Let the bars cool in the pan on a wire rack for at least 30 minutes before lifting out using the parchment overhang. For cleaner cuts, cool completely (about 1 hour) before slicing into 16 squares. A lightly oiled knife helps prevent sticking.