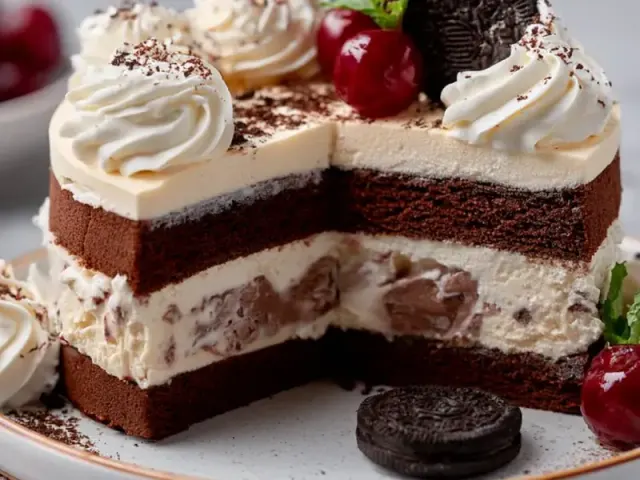
Whipped Cream Frosted Ice Cream Cake Recipe
The first time I made a whipped cream frosted ice cream cake, I learned a hard lesson about moisture. I had slathered on a cloud of freshly whipped cream, popped the cake into the freezer, and checked it an hour later. The frosting had weeped—little beads of water sat on the surface, and the once-fluffy peaks had deflated into a sad, flat mess. The cake itself was delicious, but the presentation was a disaster.

That’s when I started testing ways to stabilize whipped cream for the freezer. The trick, I discovered, is a small amount of instant pudding mix. It doesn’t change the flavor, but it acts as a stabilizer, absorbing excess moisture and keeping those peaks proud even after a deep freeze. This cake is built on that technique: a crunchy chocolate wafer crust, two layers of your favorite ice cream, and a billowy, stable whipped cream frosting that looks as good as it tastes.
Why This Method Works
Most ice cream cakes rely on a layer of fudge or caramel to bridge the ice cream and the frosting, but that can make the cake overly sweet. Using a stabilized whipped cream keeps the whole dessert lighter. The pudding mix contains cornstarch and modified food starch, which bind with the water in the cream. When frozen, that water stays locked in place instead of migrating to the surface. The result is a frosting that slices cleanly, holds its shape, and doesn’t turn icy.
Choosing Your Ice Cream
Texture matters here. You want premium ice cream with a higher fat content—around 14 to 16 percent butterfat. Lower-fat ice creams contain more air and water, which means more ice crystals and a less creamy final cake. I use one vanilla and one chocolate, but you can swap in any flavor combination. Just make sure each layer is fully frozen before you add the next, or the colors will bleed together.
Step-by-Step Assembly
The Crust
Chocolate wafer crumbs make a firm, buttery base that doesn’t get soggy. You can also use crushed Oreos (filling and all) or graham crackers. The key ratio is 2 cups crumbs to 6 tablespoons melted butter. That’s enough fat to hold the crumbs together without making the crust greasy. Press the mixture firmly into the bottom of a parchment-lined 9-inch springform pan. Use the bottom of a measuring cup to get an even layer. Freeze for 15 minutes while you soften the ice cream.
The Ice Cream Layers
Take the vanilla ice cream out of the freezer and let it sit at room temperature for 10 to 15 minutes. You want it soft enough to spread like thick frosting, not melted into soup. If it gets too soft, pop it back in the freezer for 5 minutes. Spread it evenly over the crust with an offset spatula. Freeze for 1 hour. Repeat with the chocolate layer, then freeze for at least 4 hours, preferably overnight. This long freeze ensures the layers are solid enough to frost without shifting.
The Frosting
Chill your mixing bowl and beaters for 10 minutes before starting. Cold equipment helps the cream whip faster and more stably. Combine 2 cups cold heavy cream, 1/2 cup sifted powdered sugar, 1 teaspoon vanilla, 1/4 teaspoon salt, and 1 tablespoon instant vanilla pudding mix. Beat on medium-high speed. Watch closely—the cream will go from soft peaks (droopy) to stiff peaks (standing straight up) in about 3 to 4 minutes. Stop immediately. Overbeaten cream turns grainy and then buttery, and there’s no fixing it.
Remove the cake from the springform pan. Place it on a serving plate or cake stand. Work quickly: spread the whipped cream over the top and sides with the offset spatula. The cold cake will start to set the frosting, so you have about 5 minutes to get it smooth. For a decorative touch, press mini chocolate chips onto the sides or pipe extra rosettes on top. Freeze for at least 2 more hours before serving.
Serving and Storage
Let the cake sit at room temperature for 5 to 10 minutes before slicing. This softens the ice cream just enough for a clean cut. Dip your knife in hot water, wipe it dry, and slice. Wipe the blade between cuts. Store any leftovers in the freezer, tightly wrapped in plastic wrap and then foil, for up to 2 weeks. The whipped cream will stay fluffy the whole time.
Common Mistakes to Avoid
First, don’t skip the long freeze between layers. If you add the chocolate ice cream while the vanilla is still soft, the two layers will mix into a muddy mess. Second, don’t overbeat the cream. Stop at stiff peaks. Third, don’t use a non-stick pan for the crust—the crumbs won’t hold as well. A regular springform pan with parchment is best.
For a dairy-free version, use full-fat coconut cream (chilled and whipped) and dairy-free ice cream. The coconut cream will be slightly less stable, so add 2 teaspoons of cornstarch while whipping. For gluten-free, use gluten-free chocolate wafer cookies.
Takeaway
A whipped cream frosted ice cream cake is a showstopper that looks like you spent hours, but the active work is only about 30 minutes. The rest is freezer time. The stabilized whipped cream is the secret—it keeps the cake beautiful and sliceable for days. Try it for a birthday, a summer party, or any occasion that calls for a cold, creamy celebration.
Frequently Asked Questions
Why did my whipped cream frosting turn grainy or watery?
This usually happens when the cream is overbeaten or the bowl wasn't cold enough. Start with a chilled bowl and beaters, and whip just until stiff peaks form. Stop the mixer frequently to check. If you see the cream starting to separate, you've gone too far.
Can I use store-bought whipped topping instead of homemade whipped cream?
Yes, you can substitute 4 cups of thawed frozen whipped topping. It is more stable than homemade whipped cream, but the flavor and texture are different—lighter and sweeter. If you want a richer, creamier taste, stick with homemade.
How do I get clean slices of ice cream cake?
Let the cake sit at room temperature for 5-10 minutes before slicing. Use a long, sharp chef's knife. Dip the blade in hot water, wipe it dry, then make one clean cut. Wipe the blade clean and reheat between each slice for the best results.
Can I use different ice cream flavors?
Absolutely. Keep the same total volume (3 quarts) and make sure each layer is fully frozen before adding the next. Cookie dough, strawberry, or mint chocolate chip all work well. Just avoid very soft or gelato-style ice creams, as they can be too soft to layer neatly.
Whipped Cream Frosted Ice Cream Cake

A no-bake ice cream cake with a crunchy cookie crust, two ice cream layers, and a stable whipped cream frosting that holds its shape even when frozen.
- 9-inch springform pan
- electric mixer
- large mixing bowl
- rubber spatula
- offset spatula
- parchment paper
- plastic wrap
- For the crust: 2 cups chocolate wafer crumbs (about 36 wafers, 6 tablespoons unsalted butter, melted, 2 tablespoons granulated sugar. For the ice cream layers: 1.5 quarts vanilla ice cream, softened, 1.5 quarts chocolate ice cream, softened. For the whipped cream frosting: 2 cups heavy cream, cold, 1/2 cup powdered sugar, sifted, 1 teaspoon vanilla extract, 1/4 teaspoon salt, 1 tablespoon instant vanilla pudding mix (optional, for stability). For decoration: 1/2 cup mini chocolate chips or chocolate shavings.)
- Line the bottom of a 9-inch springform pan with a round of parchment paper. 2. In a medium bowl, combine chocolate wafer crumbs, melted butter, and sugar. Press firmly into the bottom of the pan. Freeze for 15 minutes. 3. Spread softened vanilla ice cream evenly over the crust. Smooth the top with an offset spatula. Freeze for 1 hour until firm. 4. Spread softened chocolate ice cream over the vanilla layer. Smooth and freeze for at least 4 hours, or overnight. 5. Make the frosting: In a large chilled bowl, combine heavy cream, powdered sugar, vanilla, salt, and pudding mix if using. Beat on medium-high speed until stiff peaks form—when you lift the beaters, the cream stands straight up. Do not overbeat, or it will turn buttery. 6. Remove the cake from the springform pan. Place on a serving plate. 7. Frost the top and sides with the whipped cream, working quickly. Use the offset spatula for smooth swirls. 8. Press mini chocolate chips onto the sides if desired. Freeze for at least 2 hours before serving. 9. To serve, let the cake sit at room temperature for 5-10 minutes for easier slicing. Use a sharp knife dipped in hot water and wiped dry between cuts.
Storage: Keep the cake frozen, well-covered, for up to 2 weeks. For a dairy-free version, use coconut cream whipped topping and dairy-free ice cream. The pudding mix is optional but helps the whipped cream hold its shape for days. Common allergens: dairy, gluten (use gluten-free wafers if needed). For dietary concerns, consult a qualified professional.
Recipe: Whipped Cream Frosted Ice Cream Cake
Equipment
- 9-inch springform pan
- electric mixer
- large mixing bowl
- rubber spatula
- offset spatula
- parchment paper
- plastic wrap
Ingredients
- For the crust: 2 cups chocolate wafer crumbs (about 36 wafers, 6 tablespoons unsalted butter, melted, 2 tablespoons granulated sugar. For the ice cream layers: 1.5 quarts vanilla ice cream, softened, 1.5 quarts chocolate ice cream, softened. For the whipped cream frosting: 2 cups heavy cream, cold, 1/2 cup powdered sugar, sifted, 1 teaspoon vanilla extract, 1/4 teaspoon salt, 1 tablespoon instant vanilla pudding mix (optional, for stability). For decoration: 1/2 cup mini chocolate chips or chocolate shavings.)
Instructions
- Line the bottom of a 9-inch springform pan with a round of parchment paper. 2. In a medium bowl, combine chocolate wafer crumbs, melted butter, and sugar. Press firmly into the bottom of the pan. Freeze for 15 minutes. 3. Spread softened vanilla ice cream evenly over the crust. Smooth the top with an offset spatula. Freeze for 1 hour until firm. 4. Spread softened chocolate ice cream over the vanilla layer. Smooth and freeze for at least 4 hours, or overnight. 5. Make the frosting: In a large chilled bowl, combine heavy cream, powdered sugar, vanilla, salt, and pudding mix if using. Beat on medium-high speed until stiff peaks form—when you lift the beaters, the cream stands straight up. Do not overbeat, or it will turn buttery. 6. Remove the cake from the springform pan. Place on a serving plate. 7. Frost the top and sides with the whipped cream, working quickly. Use the offset spatula for smooth swirls. 8. Press mini chocolate chips onto the sides if desired. Freeze for at least 2 hours before serving. 9. To serve, let the cake sit at room temperature for 5-10 minutes for easier slicing. Use a sharp knife dipped in hot water and wiped dry between cuts.